

Internet of Things Plant Monitor
One of the problems that amateur gardeners face is that we're sometimes unsure whether we are watering our plants not enough or too much. As a side project, I installed Internet of Things sensors to track the soil moisture, temperature and humidity of my basil plants.
Moisture [%]
Temperature [°F]
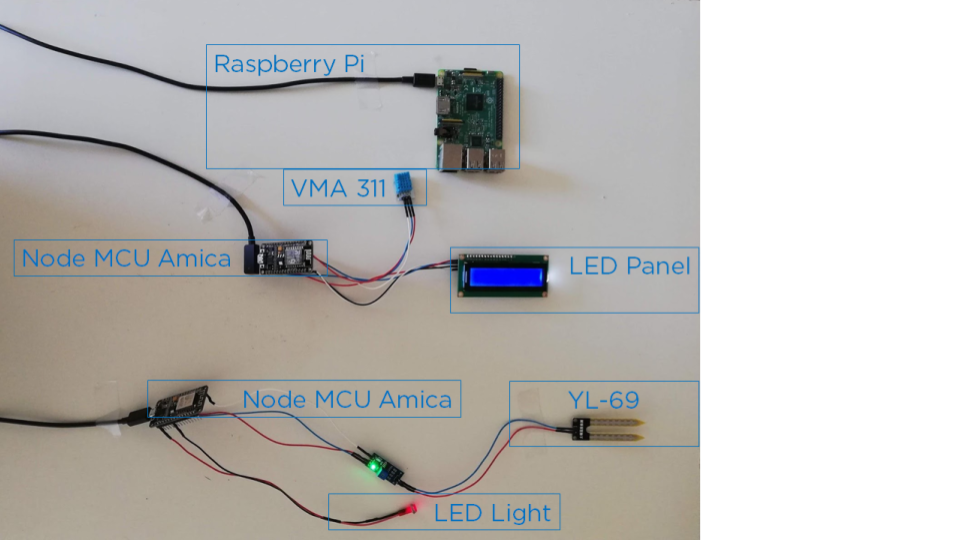
Equipment
|
|
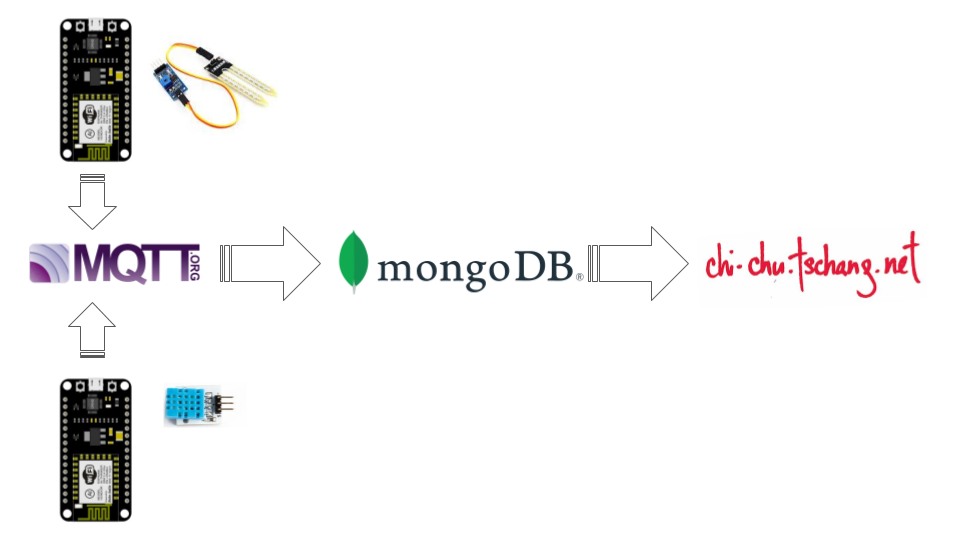
Architecture
The architecture for this Internet of Things side project is fairly straightforward. The sensors collect data from the soil and air. The data is sent via Wi-Fi to an Internet gateway, which in this case is the MQTT program running on a Raspberry Pi. The MQTT program sends the data to a MongoDB database in the cloud. This website pulls the data from the cloud and renders the data in the form of graphs.
Temperature
For the temperature and humidity sensor, I connected a VMA 311 sensor and RGB backlight LCD panel to a Node MCU Amica development board with Wi-Fi. This Portable Arduino Temp/Humidity Sensor with LCD tutorial explains how to set up the VMA 311 sensor and LCD panel to the Node MCU Amica. I connected the VMA 311 and LCD panel to the Node MCU Amica as follows:
| Node MCU Amica | VMA 311 | Node MCU Amica | LCD | |
|---|---|---|---|---|
| D4 | S | GND | GND | |
| 3V3 | + | VIN | VCC | |
| GND | - | D2 | SDA | |
| D1 | SCL | |||
| 3V3 | + | VIN | VCC | |
| GND | - | D2 | SDA | |
| D1 | SCL |
For the software, the first step was to determine the I2C address of the LCD panel. Fortunately, this NodeMCU i2c Scanner on Arduino IDE tutorial provided the code to test the I2C address for the LCD code. The first step was to write the Arduino code to collect the temperature and humidity data using the VMA 311. I could have requested the VMA 311 sensor to collect the temperature and humidity every minute or hour, which would have collected a large amount of data. Instead, I request the VMA 311 sensor to log the data when the temperature changed 1 degree warmer or cooler. Next, I added code to render the temperature and humidity data on the LCD panel. Once the sensor data was working, the next step was to find a way to transfer the data to a database. The lightweight MQTT message broker routes the data collected from the sensors to a database. This ESP8266: Connecting to MQTT broker tutorial explains how to set up the Arduino code to send the data to a MQTT broker, which will be hosted on a Raspberry Pi. Finally, I wrote code to connect the ESP8266 to my Wi-Fi network and connect to the MQTT broker, which is being hosted on a Raspberry Pi. Here is the code:
            #include <ArduinoJson.h>
                        #include <Arduino.h>
                        #include <Adafruit_Sensor.h>
                        #include <DHT.h>
                        #include <PubSubClient.h>
                        #include <ESP8266WiFi.h>
                        #include <ESP8266WiFiAP.h>
                        #include <ESP8266WiFiGeneric.h>
                        #include <ESP8266WiFiMulti.h>
                        #include <ESP8266WiFiScan.h>
                        #include <ESP8266WiFiSTA.h>
                        #include <ESP8266WiFiType.h>
                        #include <LiquidCrystal.h>
                        #include <LiquidCrystal_I2C.h>
                        #include <WiFiClient.h>
                        #include <WiFiClientSecure.h>
                        #include <WiFiServer.h>
                        #include <WiFiUdp.h>
                        #include <Wire.h>

                        const char* ssid= //Wi-Fi network
                        const char* password = //Wi-Fi password
                        const char* mqtt_server = "192.168.1.150";

                        #define humidity_topic "sensor/humidity"
                        #define temperature_topic "sensor/temperature"

                        #define DHTPIN 7
                        #define DHTTYPE DHT11
                        #define DHTPIN 2        //Connect the VMA311 sensor to Pin D4 of Node MCU

                        WiFiClient espClient;
                        PubSubClient client(espClient);
                        DHT dht(DHTPIN, DHTTYPE, 11);

                        //set LCD address to 0x38 for a 16 chars and 2 line display
                        LiquidCrystal_I2C lcd(0x38, 16, 2);

                        char dataString[50] = {0};
                        int a = 0;

                        void setup() {
                          // put your setup code here, to run once:
                          Serial.begin(115200);
                          dht.begin();
                          setup_wifi();
                          client.setServer(mqtt_server, 1883);
                          lcd.begin(16,2);
                          lcd.init();
                          lcd.backlight();
                        }

                        void setup_wifi(){
                          delay(10);
                          //connect to Wi-Fi
                          Serial.println();
                          Serial.print("connecting to ");
                          Serial.println(ssid);

                          WiFi.begin(ssid, password);

                          while(WiFi.status() != WL_CONNECTED){
                            delay(500);
                            Serial.print(".");
                          }
                          Serial.println("");
                          Serial.println("Wi-Fi connected");
                          Serial.println("IP address: ");
                          Serial.println(WiFi.localIP());
                        }

                        void reconnect(){
                          while(!client.connected()){
                            Serial.print("Attempting MQTT connection...");
                            if(client.connect("Sensors")){
                              Serial.println("connected");
                            } else {
                              Serial.print("failed, rc= ");
                              Serial.print(client.state());
                              Serial.println("Try again in 5 seconds");
                              delay(5000);
                            }
                          }
                        }

                        bool checkBound(float newValue, float prevValue, float maxDiff){
                          return !isnan(newValue) && (newValue < prevValue - maxDiff || newValue > prevValue + maxDiff);
                        }

                        long lastMsg = 0;
                        float tempC = 0.0;
                        float tempF = 0.0;
                        float humidity = 0.0;
                        float difference = 1.0;

                        void loop() {
                          // put your main code here, to run repeatedly:
                          if(!client.connected()){
                            reconnect();
                          }
                          client.loop();

                          lcd.home();

                          long now = millis();
                          if(now - lastMsg > 2000){
                            lastMsg = now;

                          float h = dht.readHumidity();
                          float c = dht.readTemperature();      //Celsius
                          float f = dht.readTemperature(true);  //Fahrenheit

                          //set the cursor to (0,0);
                          lcd.setCursor(0,0);

                          //print temperature on LCD screen
                          lcd.print("Temperature ");
                          lcd.print(f,0);
                          lcd.print((char)223);
                          lcd.print("F");

                          //set the cursor to (16,1);
                          lcd.setCursor(0,1);

                          //print humidity on LCD screen
                          lcd.print("Humidity ");
                          lcd.print(h, 1);
                          lcd.print("%");

                          //a value increase every loop
                          a++;

                          //convert a value to hexa
                          //sprintf(dataString,"%02x",a);

                          //send the data
                          Serial.println(dataString);

                          //print temperature to serial monitor
                          Serial.print("Temperature: ");
                          Serial.print(f, 1);

                          //print humidity to serial monitor
                          Serial.print("F, Humidity: ");
                          Serial.print(h, 0);
                          Serial.println("%");
                          delay(1000);

                          //do not publish temperature in Celsius
                        //  if(checkBound(c, tempC, difference)){
                        //    tempC = c;
                        //    Serial.print("Temperature: ");
                        //    Serial.print(String(tempC).c_str());
                        //    Serial.println("*C");
                        //    client.publish(temperature_topic, String(tempC).c_str(), true);
                        //    }

                          //publish temperature in Fahrenheit if changes 1 degree
                          if(checkBound(f, tempF, difference)){
                            tempF = f;
                            Serial.print("Temperature: ");
                            Serial.print(String(tempF).c_str());
                            Serial.println("*F");
                            client.publish(temperature_topic, String(tempF).c_str(), true);
                            }

                          //publish humidity if changes 1 degree
                          if(checkBound(h, humidity, difference)){
                            humidity = h;
                            Serial.print("Humidity: ");
                            Serial.println(String(humidity).c_str());
                            client.publish(humidity_topic, String(humidity).c_str(), true);
                            }
                          }
                        }
Soil Moisture Sensor
For the soil moisture sensor, I connected a YL-69 sensor to a separate Node MCU Amica. Rather than connect another LCD panel, I connected a red LED light to the Node MCU Amica to light up if the plant needs to be watered. The Measuring Soil Moisture With the NodeMCU Amica (ESP8266) and Arduino Soil Moisture Sensor Calibration tutorials were probably the most helpful in terms of setting up the YL-69 sensor. I connected the YL-69 sensor and LED light to the Node MCU Amica as follows:
| Node MCU Amica | YL-69 | ||
|---|---|---|---|
| VCC | 3V3 | ||
| GND | GND | ||
| A0 | A0 |
For the software, the first step was to write the code in Arduino IDE to collect the soil moisture data and map the raw data from 0% to 100%. This Arduino Soil Moisture Sensor Calibration tutorial does an excellent job of explaining how to calibrate the soil moisture sensors. Then, I added the code to turn on the red LED light when the moisture level dropped below 30%. Finally, I wrote the code to connect this ESP8266 to my Wi-Fi and connect to the MQTT broker, which is being hosted on a Raspberry Pi. Here is the code:
          #include <ArduinoJson.h>
                      #include <Arduino.h>
                      #include <Adafruit_Sensor.h>
                      #include <PubSubClient.h>
                      #include <ESP8266WiFi.h>
                      #include <ESP8266WiFiAP.h>
                      #include <ESP8266WiFiGeneric.h>
                      #include <ESP8266WiFiMulti.h>
                      #include <ESP8266WiFiScan.h>
                      #include <ESP8266WiFiSTA.h>
                      #include <ESP8266WiFiType.h>
                      #include <WiFiClient.h>
                      #include <WiFiClientSecure.h>
                      #include <WiFiServer.h>
                      #include <WiFiUdp.h>

                      const char* ssid= //Wi-Fi network
                      const char* password = //Wi-Fi password
                      const char* mqtt_server = "192.168.1.150";

                      int sensor_pin = A0;       //set AO as pin for YL-69
                      int LEDPin = 13;           //sets D7 as pin for LED
                      int m=0;

                      #define moisture_topic "sensor/moisture"

                      WiFiClient espClient;
                      PubSubClient client(espClient);

                      void setup() {
                        // put your setup code here, to run once:
                        pinMode(LEDPin, OUTPUT);
                        digitalWrite(LEDPin, LOW);
                        Serial.begin(115200);
                        setup_wifi();
                        client.setServer(mqtt_server, 1883);
                      }

                      void setup_wifi(){
                        delay(10);
                        //connect to Wi-Fi
                        Serial.println();
                        Serial.print("connecting to ");
                        Serial.println(ssid);

                        WiFi.begin(ssid, password);

                        while(WiFi.status() != WL_CONNECTED){
                          delay(500);
                          Serial.print(".");
                        }
                        Serial.println("");
                        Serial.println("Wi-Fi connected");
                        Serial.println("IP address: ");
                        Serial.println(WiFi.localIP());
                      }

                      void reconnect(){
                        while(!client.connected()){
                          Serial.print("Attempting MQTT connection...");
                          if(client.connect("Sensors")){
                            Serial.println("connected");
                            } else {
                            Serial.print("failed, rc= ");
                            Serial.print(client.state());
                            Serial.println("Try again in 5 seconds");
                            delay(5000);
                            }
                        }
                      }

                      void loop() {
                        // put your main code here, to run repeatedly:
                        if(!client.connected()){
                          reconnect();
                          }
                        client.loop();

                        //publish moisture
                            m = analogRead(sensor_pin);
                            m = constrain(m, 485, 1023);
                            m = map(m, 485, 1023, 100, 0);

                            Serial.print("Moisture: ");
                            Serial.println(m);
                            client.publish(moisture_topic, String(m).c_str(), true);
                            //turn on LED light if soil moisture < 30%
                            if(m < 30){
                              digitalWrite(LEDPin, LOW);
                            }
                            else if(m > 30){
                              digitalWrite(LEDPin, HIGH);
                            }

                          //every hour
                          delay(1000*60*60);
                        }
MQTT
Once the sensors are up and running, we want to send the data to a Message Queue Telemetry Transport (MQTT), which will redirect the data to the MongoDB database. This Implementing an end-to-end IoT solution in MongoDB: From sensor to cloud MongoDB blog explains the architecture of setting up an IoT temperature sensor to a MongoDB database. I wrote code in Python using the Eclipse Paho MQTT Python Client to subscribe to messages from the Node MCU Amica board. The code then connects to a MongoDB database and publishes the data in JSON format in the database. The code is stored in a Raspberry Pi folder. To run the code, plug in the Raspberry Pi, go to the correct folder and simply run "python MQTT-MongoDB.py." Here is the code:
            import paho.mqtt.client as mqtt
                        import datetime
                        from pymongo import MongoClient

                        def on_connect(client, userdata, flags, rc):
                            print("Connected with result code "+str(rc))
                            client.subscribe("/sensor/#")

                        def on_message(client, userdata, msg):
                            receiveTime=datetime.datetime.now()
                            message=msg.payload.decode("utf-8")
                            isfloatValue=False
                            try:
                                #convert the string to a float so that it is stored as a number and not a string in the database
                                val = float(message)
                                isfloatValue=True
                            except:
                                isfloatValue=False

                            if isfloatValue:
                                print(str(receiveTime)+": "+msg.topic+" "+str(val))
                                post={"time":receiveTime,"topic":msg.topic,"value": val}
                            else:
                                print(str(receiveTime)+": "+msg.topic+" "+message)
                                post={"time":receiveTime,"topic":msg.topic,"value": message}
                            collection.insert_one(post)

                        #set up client for MongoDB

                        mongoClient=MongoClient('mongodb://tschang:<password>@plants-shard-00-00-l7uuf.mongdb.net:27017,plants-shard-00-01-l7uuf.mongodb.net:27017,plants-shard-00-02-l7uuf.mongodb.net:27017/basil?ssl=true&replicaSet=plants-shard-0&authSource=admin&retryWrites=true')
                        db=mongoClient.basil
                        collection=db.july2020

                        #initialize the client that should connect to the Mosquitto broker
                        client = mqtt.Client()
                        client.on_connect = on_connect
                        client.on_message = on_message
                        client.connect("192.168.1.150", 1883, 60)
                        #blocking loop to the Mosquitto broker
                        client.loop_forever()
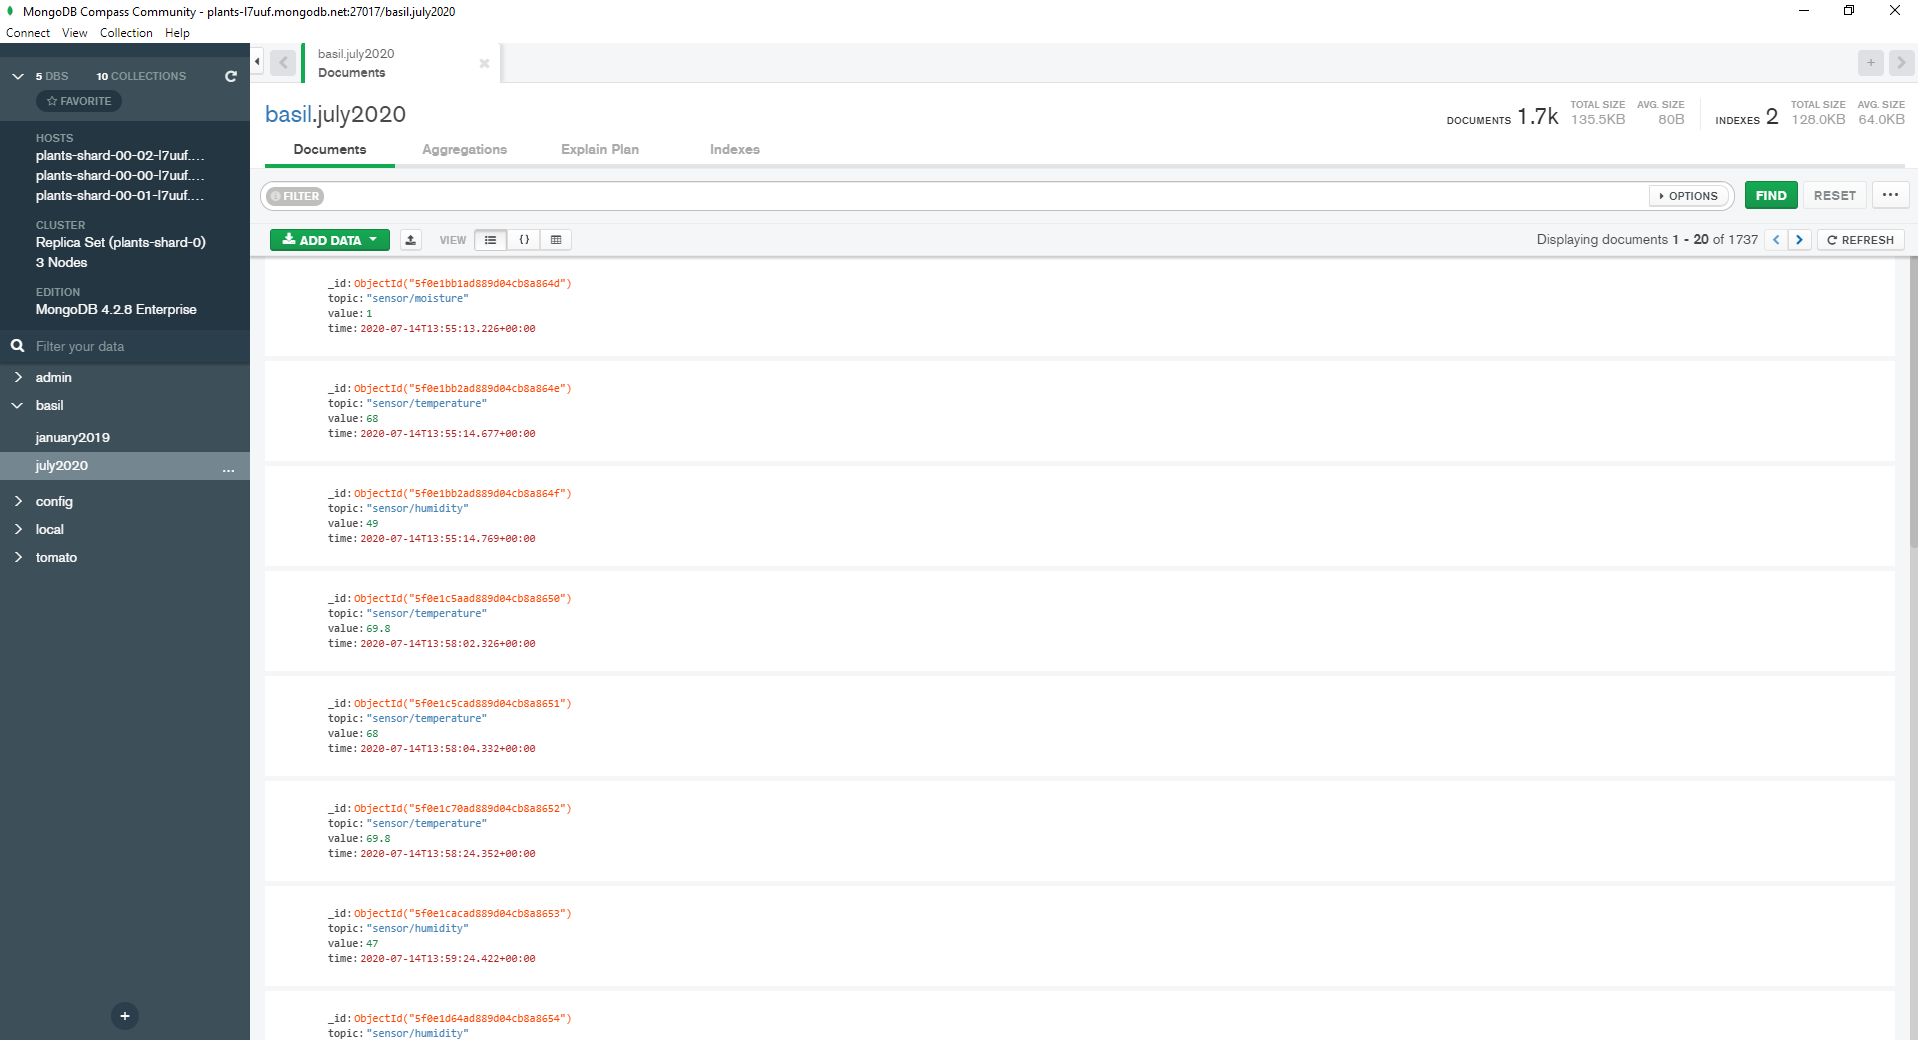
MongoDB
In the original version, I sent the data collected from sensors to AWS DynamoDB. I decided to switch to a MongoDB database partially to lower my monthly expenditures to Amazon and partially to learn how to use a MongoDB database. In MongoDB, I created a new cluster called "plants" and a database for each plant I am trying to grow. For the purpose of this project, my database name is "basil" because I am growing basil and the collection name is "july2020" because I started growing the basil in July 2020. Once the VMA 311 and YL-69 sensors and MQTT client are plugged in and running, we can check whether the data is being sent to the MongoDB by connecting to the database via MongoDB Compass or logging into the MongoDB website.
D3.js
Now that the data is stored in the MongoDB database, I want to graph the data on this website. First, I posted the moisture, temperature and humidity data in json format on this website's /projects/plants/moisture, projects/plants/temperature and projects/plants/humidity pages, respectively. Then, I used d3.js to pull the data from the webpages and draw the line graphs for each of the data by plotting the time on the x-axis and the values on the y-axis. These D3 v5 Line Chart and Making a Line Chart in D3.js v.5 tutorials were very helpful in terms of explaining how to draw a line chart in version 5 of D3.js compared with the earlier versions. Here is the code:
          <script>

                      //set margins and size of graph
                      var margin = {top: 10, right: 20, bottom: 20, left: 30},
                        height = 200 - margin.top - margin.bottom,
                        width = 1150 - margin.left - margin.right

                      //set x-axis range
                      var x = d3.scaleTime().range([0, width - margin.right])

                      //set y-axis range
                      var y = d3.scaleLinear().range([height, 0]);

                      //draw moisture chart
                      var svg1 = d3.select("div#moisture").append("svg")
                          .attr("width", width + margin.left + margin.right)
                          .attr("height", height + margin.top + margin.bottom)
                        .append("g")
                          .attr("transform", "translate(" + margin.left + "," + margin.top + ")");

                      //retrieve moisture data in json format from ./projects/plants/moisture
                      var moistureurl="./moisture"

                      d3.json(moistureurl).then(function(data){

                          //format moisture data
                          data.forEach(function(d){
                            d.time = d3.isoParse(d.time);
                            d.value = +d.value;
                          })

                          //set the ranges of the data
                          x.domain(d3.extent(data, function(d) { return d.time;}));
                          y.domain([0, d3.max(data, function(d) { return d.value;})]);

                          //define the line
                          var moistureline = d3.line()
                            .x(function(d) { return x(d.time); })
                            .y(function(d) { return y(d.value); });

                          //add path of line
                          svg1.append("path")
                            .data([data])
                            .attr("class", "moistureline")
                            .attr("d", moistureline)

                          //add x-axis
                          svg1.append("g")
                            .attr("class","x-axis")
                            .attr("transform", "translate(0," + height +")")
                            .call(d3.axisBottom(x).ticks(width / 100).tickFormat(d3.timeFormat("%m/%d/%Y")).tickSizeOuter(0));

                            //add y-axis
                          svg1.append("g")
                            .attr("class", "y-axis")
                            .call(d3.axisLeft(y));

                        });
                        </script>
Unfortunately, the volume of data posted slowed down this website after a week. In the end, I downloaded the data from MongoDB and uploaded it into Observable to graph the data and embed the graph on this website.